Plinqx Publisher Inbound APIs
Available: Base
Overview
Plinqx Publisher (Inbound) provides inbound endpoints that external systems can call to initiate processing in Salesforce. Each inbound endpoint is configured with:
- A name, category, and description (for discoverability)
- An API Endpoint URL/path (the inbound address)
- Direction (Inbound)
- HTTP methods allowed (e.g., GET/POST/PUT/PATCH/DELETE)
- Execution target (e.g., Flow or Apex)
- Permissions required to access the endpoint
Tip for admins/configurators: Use clear categories and descriptions - these appear in the endpoint details panel and are used for documentation.
Audience and responsibilities
Plinqx administrators / configurators
Typically:
- Create or edit inbound endpoints
- Assign execution type (Flow or Apex)
- Configure permissions, HTTP methods, and activation status
- Maintain governance (naming, categories, documentation)
Navigate to Inbound Endpoints
- In Salesforce, open the Plinqx app.
- Go to Publisher.
- Open Events and Endpoints (Inbound).
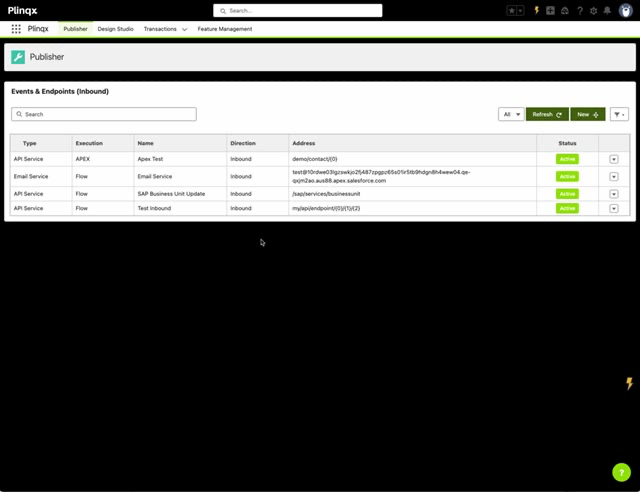
What you'll see
The inbound endpoints table includes columns such as:
- Type, Execution, Name, Direction, Address, and Status.
Use:
- Refresh to reload the list
- New to create a new inbound endpoint
- Search to search by Type or Name
- Click the configured Inbound configuration to see the details panel
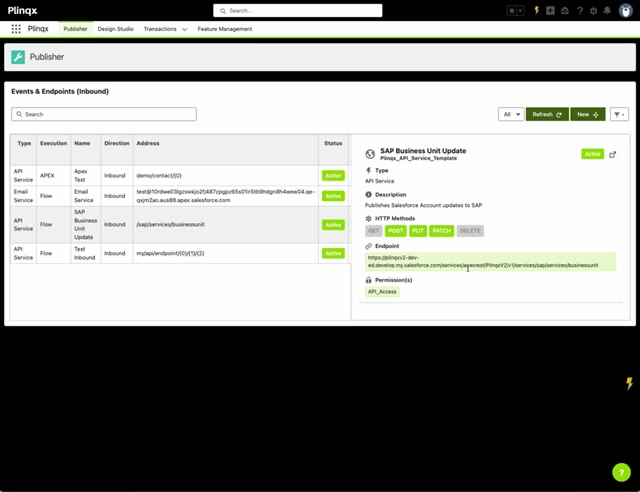
View an existing Inbound API (End users and Admins)
- From Events and Endpoints (Inbound), select an endpoint row.
- Review the details panel on the right.
In the details panel you can confirm:
- Type (e.g., API Service)
- Description
- Allowed HTTP methods
- The Endpoint URL
- Required Permission(s)
Operational check: Ensure the endpoint Status is Active before providing it to an external system, also ensure the required HTTP methods are enabled on the endpoint GET, POST, PUT, PATCH, DELETE.
Create or edit an Inbound API (Admins / Configurators)
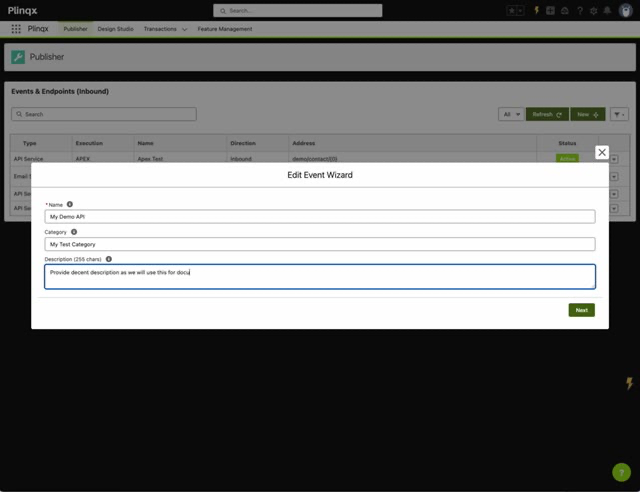
Creating and editing inbound endpoints uses the Edit Event Wizard.
Step 1 - Define the endpoint
-
Click New (or to edit, select the Edit action from the line actions dropdown).
-
Complete:
- Name (required)
- Category *(used for list filtering) *
- Description (up to 255 characters)
-
Click Next.
Recommended standards
- Name: Verb + object (e.g., "Create Contact", "Update Business Unit")
- Category: Integration domain (e.g., "SAP", "CRM", "Payments")
- Description: Include what the endpoint does and what it returns/affects.
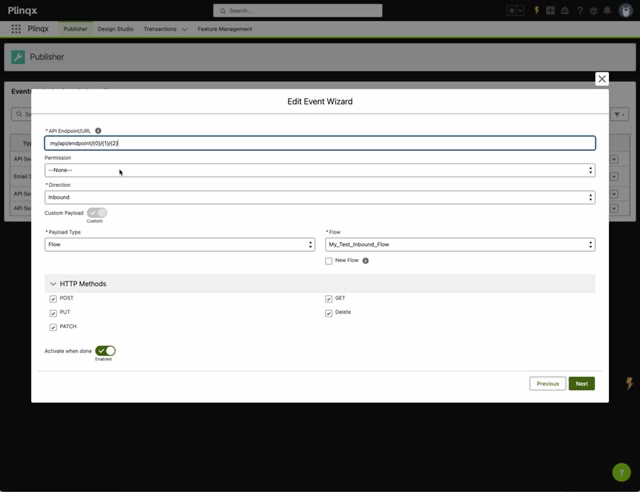
Step 2 - Configure endpoint behaviour and security
Complete the configuration fields:
API Endpoint URL (required)
- Provide the endpoint URL/path value used for inbound routing.
Permission
- Select the permission required to access the endpoint (e.g.,
API_ACCESS).
Direction
- Set to Inbound.
Custom Payload
- This option is enabled by default and can not be changed
Execution
Choose how the inbound request is processed:
- Flow: Route the inbound request to a Salesforce Flow (select from the Flow picker).
- APEX: Route the inbound request to Apex (use when you require code-based processing).
For Apex payload type you must have a valid aplex class that implements the PlinqxV2.PayloadInterface.Payload_Interface interface class, within your org.
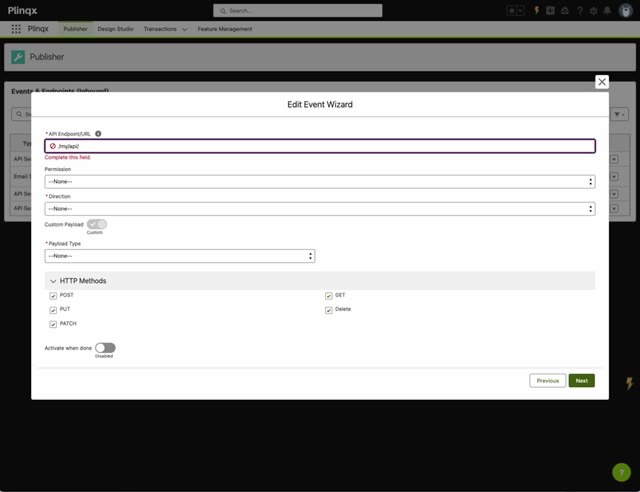
HTTP Methods
Select the methods you want to permit for this endpoint (e.g., POST, PUT, PATCH, GET, DELETE).
Activate when done
Enable this toggle when you are ready for external consumers to start calling the endpoint.
Flow execution example
When Flow is selected, choose an existing Flow from the selector (use New Flow if you want to create a new flow for this inbound API).
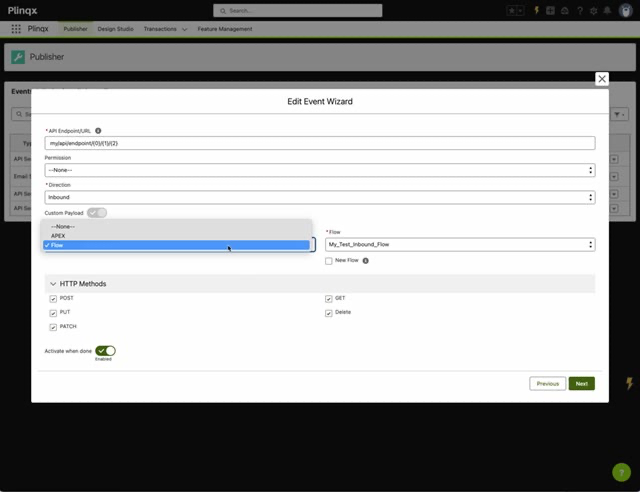
When using Flow configuration,confirm:
- Execution is set to Flow
- The correct Flow is selected
Testing and validation checklist (Admins / Configurators)
Before handing an inbound endpoint to an integration partner:
- Confirm Status = Active
- Confirm HTTP methods match the intended use (e.g., POST only for create)
- Confirm the Permission is correct and assigned to the integration user/context (if required - optional)
- Confirm the assigned Flow/Apex is deployed, active, and behaves as expected
- Confirm the endpoint URL is copied exactly as shown in the details panel
Troubleshooting
Endpoint returns "not authorised" / access denied
- The calling user/context likely does not have the required Permission configured on the endpoint.
- Validate the permission assignment and security model.
Method not allowed
- The external caller is using an HTTP method that is not enabled for the endpoint.
- Update the endpoint's HTTP methods configuration or correct the caller.
Endpoint is not callable / not visible to users
- Confirm it is Active.
- Refresh the list and re-open the endpoint details panel.
Flow does not run / incorrect behaviour
- Confirm the correct Flow is selected.
- Validate Flow activation and versioning in Salesforce.
Tutorials
If you want step-by-step examples, use the inbound tutorials below: